A Doorbell You Can See: Flashing the Lights with Shelly 1 Gen4
A doorbell chime only works if you can hear it. This project adds a Shelly 1 Gen4 between the button and the chime, so the doorbell still rings like it always has, and the lights in the house turn on at the same time. For someone with a hearing impairment, that means no more missed deliveries or visitors left standing at the door. An optional script flashes the lights several times.
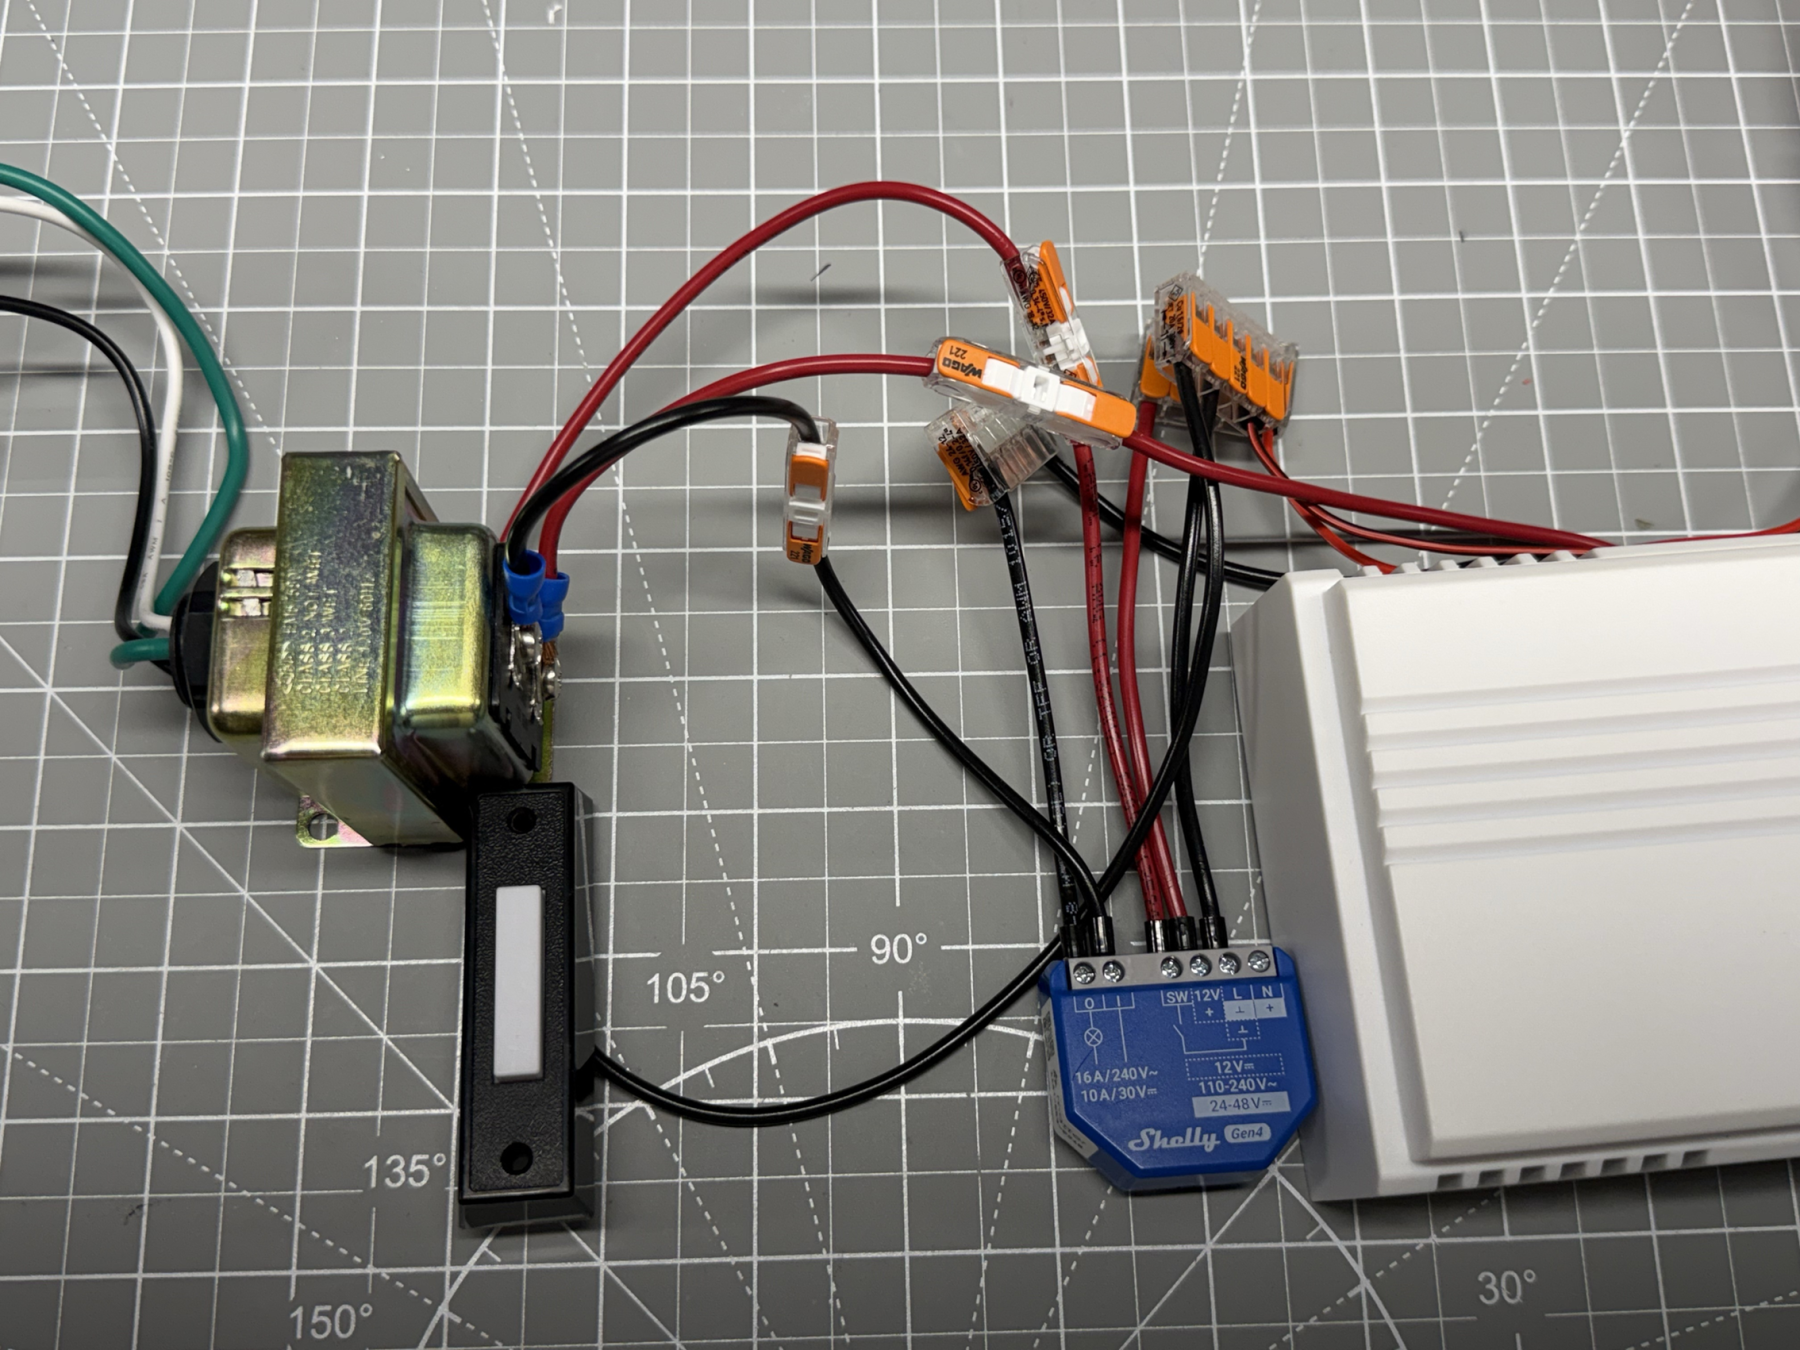
Title: A Doorbell You Can See: Flashing the Lights with Shelly 1 Gen4
Category: Wiring
Summary: Keep the regular doorbell chime and add flashing lights for anyone in the house who can't hear it, using a Shelly 1 Gen4, a 12V DC power supply and the Actions menu.
A doorbell is one of the simplest circuits in a house. A small transformer puts out somewhere between 10 and 24 volts AC (16 volts on most of them), the button closes the circuit, and the chime rings. That works great until someone in the house can't hear the chime.
This project puts a Shelly 1 Gen4 between the button and the chime. When someone presses the button, the chime still rings like it always has, and the lights in the house turn on for a couple of seconds so anyone with a hearing impairment knows someone is at the door. If you want something more noticeable, there's an optional script at the end that flashes the lights on and off several times.
Why the doorbell transformer can't power the Shelly
The first thing most people try is powering the Shelly 1 Gen4 from the doorbell transformer, since it's right there. It won't work. Shelly 1 Gen4 doesn't run on the 10 to 24 volts AC a doorbell transformer puts out.
Instead, we add a 120V AC to 12V DC power supply at the same place the doorbell transformer gets its power, and run the Shelly from that.
That brings up the second rule. The SW input on Shelly 1 Gen4 has to see the same voltage that powers the Shelly through its L and 12V terminals. With a 12V DC supply, that means the doorbell button switches 12V DC (the GND/negative side), not the 16 volts AC it used to.
The chime doesn't change at all. It stays on its own transformer at 16 volts AC (or whatever your chime is rated for). The relay in Shelly 1 Gen4 is a dry contact, with its own I and O terminals, so it switches the chime circuit without ever touching the 12V side. Basically the relay takes the button's place in the chime circuit, and the button becomes an input to the Shelly.
What you need
- Shelly 1 Gen4
- A hardwired 120V AC to 12V DC power supply, installed in an approved enclosure or junction box
- Your existing doorbell transformer, chime and button
- The button should be a standard doorbell button without a light in it (more on that below)
- One or more Shelly lights, relays or plugs on the same network to turn the lights on
-Wago lever connectors,wire nuts if you must, and a box for the Shelly
Turn the breaker off before you start, and confirm it's off with a tester. You're working on 120V AC where the transformer and power supply connect. If you aren't comfortable with that part, have an electrician do it.
Wiring

- Turn off the breaker that feeds the doorbell transformer.
- Install the 12V DC power supply. Find where the doorbell transformer gets its 120V AC. Connect the AC input of the 12V DC power supply to the same L and N, following the power supply's instructions.
- Pick a spot for the Shelly. It needs to reach the 12V DC supply, the doorbell transformer wires and the button wires. Near the doorbell transformer is usually easiest, or behind the chime if that's where the button wires end up.
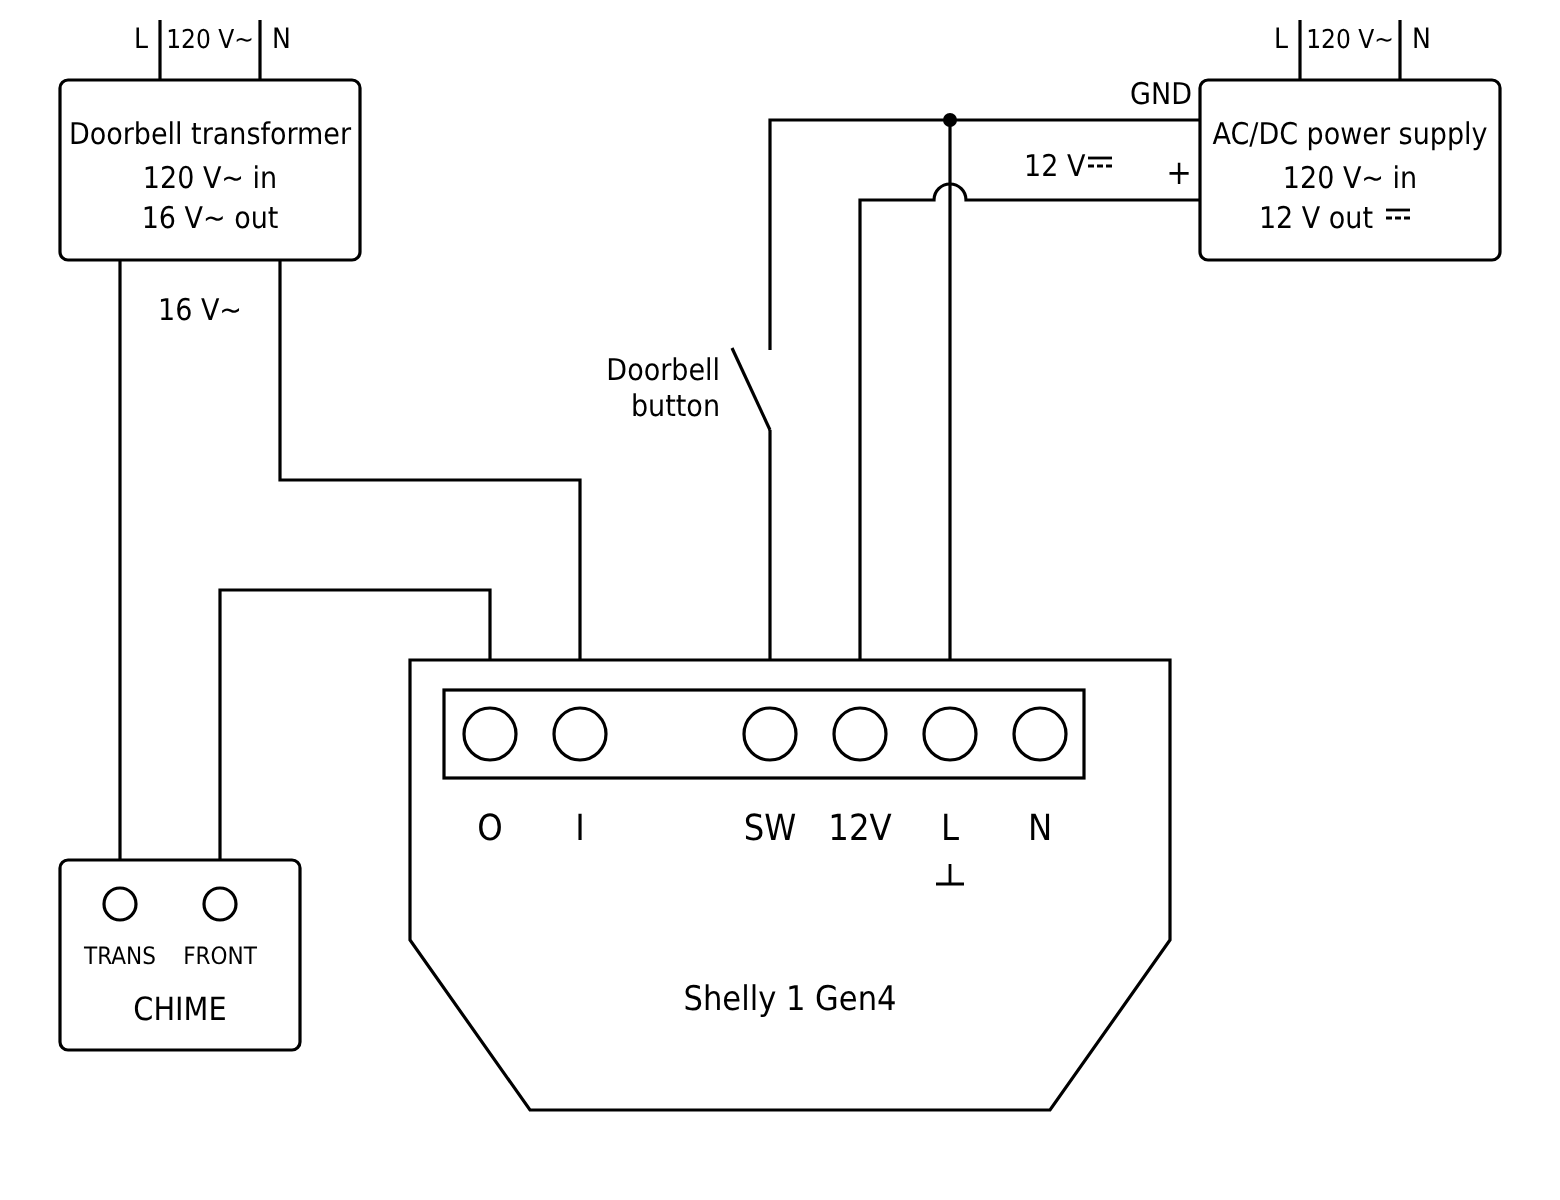
- Power the Shelly from 12V DC. Connect the power supply's + to the 12V terminal on Shelly 1 Gen4. Connect the power supply's GND (negative) to the L terminal. Leave N empty.
- Move the doorbell button to 12V DC. Disconnect both button wires from the chime circuit. Connect one button wire to the 12V DC GND (negative), and the other button wire to the SW terminal. Pressing the button now connects SW to GND, which is how the Shelly sees the press.
- Put the relay where the button used to be in the chime circuit. Disconnect one side of the doorbell transformer from the chime and connect it to the I terminal on Shelly 1 Gen4. Connect the O terminal to the chime terminal where that side of the transformer was originally connected. In the diagram, the transformer's other side stays connected to TRANS on the chime, and O goes to FRONT.
- Double check your 12V DC and 16V AC wires are separate. Only the 12V DC supply touches 12V, L and SW. Only the doorbell transformer and chime touch I and O.
- Turn the breaker back on. The Shelly should power up and show up in the Shelly Smart Control app, or as a Wi-Fi access point if it's new.
A couple of notes on the button. Lighted doorbell buttons have a small bulb or LED that lets a tiny bit of current through all the time. On a 12V DC input, that can trigger the Shelly on its own or keep it from seeing the button release, so swap it for a standard button. And this doesn't work with video doorbells, since they need constant power from the doorbell transformer through the button wires.
Software setup
Everything below is done in the Shelly Smart Control app. You can also do it from the Shelly's local web page by going to its IP address in a browser.
- Add the Shelly 1 Gen4 to the app and update it to the latest firmware.
- Set the input to Button. In the device's Input/Output settings, set the input mode to Button, and set the output so each press turns it on (Activation). Momentary also works, since the auto off timer brings it right back.
- Set the Auto off timer to 1 second. In Timers, turn on Auto off and set it to 1 second. A mechanical chime rings "ding" when the relay closes and "dong" when it opens, so the timer is what gives you the full ding-dong. If 1 second sounds too drawn out on your chime, try 0.5 seconds.
- Set the power-on default to Off. That way the chime doesn't ring every time the power comes back after an outage.
- Give your lights fixed IP addresses. Set a DHCP reservation in your router for each Shelly light you'll control. The webhooks below use IP addresses, and they'll stop working if a light gets a new one.
- Create the action. On the Shelly 1 Gen4, open Actions and create a new action. Set the trigger to Output ON. Then add one URL for each light you want to turn on, up to 5. Each one turns the light on with a 2 second timer, so it turns itself back off:
For Gen2, Gen3 and Gen4 relays and plugs:
http://192.168.1.50/rpc/Switch.Set?id=0&on=true&toggle_after=2
For Gen2, Gen3 and Gen4 dimmers, bulbs and RGBW in light mode:
http://192.168.1.51/rpc/Light.Set?id=0&on=true&toggle_after=2
For Gen1 relays:
http://192.168.1.52/relay/0?turn=on&timer=2
For Gen1 lights and dimmers:
http://192.168.1.53/light/0?turn=on&timer=2
Change the IP addresses to match your lights, and change id=0 if you're using a different channel. If you need more than 5 lights, create a second action with the same Output ON trigger.
- Test it. Press the doorbell button. The chime should ring and the lights should turn on, then turn off 2 seconds later.
One thing to watch for: toggle_after turns the light off after 2 seconds even if it was already on before the doorbell rang. If that bothers you, use the script below. It remembers how each light was and puts it back.
Optional: flash the lights several times
A light that turns on for 2 seconds is easy to miss in a bright room. This script runs on the Shelly 1 Gen4 and flashes each light on and off several times whenever the doorbell relay turns on. It reads each light's state first, so a light that was already on flashes off and on and ends up on again, and a light that was off ends up off.
If you use the script, turn off the Output ON action from step 6 so the two don't fight each other.
- On the Shelly 1 Gen4, open Scripts and create a new script.
- Paste in the code below.
- Edit the lights list at the top with your lights' IP addresses. Use "switch" for relays and plugs, and "light" for dimmers, bulbs and RGBW.
- Change flashes and stepMs if you want more flashes or a faster or slower blink.
- Save, start the script and turn on Run on startup.
// Doorbell light flasher for Shelly 1 Gen4
// When the doorbell relay turns on, this flashes one or more Shelly lights
// several times, then puts each light back the way it was.
//
// If you use this script, turn off (or delete) the "Output ON" action that
// sends the toggle_after=2 webhooks, so the two don't fight each other.

let CONFIG = {
  // Lights to flash. Use a fixed IP for each one (DHCP reservation).
  // type: "switch" for relays and plugs (Switch.Set)
  //       "light"  for dimmers, bulbs and RGBW in light mode (Light.Set)
  // id:   channel number on that device, usually 0
  lights: [
    { ip: "192.168.1.50", type: "switch", id: 0 },
    { ip: "192.168.1.51", type: "light", id: 0 }
  ],
  flashes: 5,        // number of on/off cycles
  stepMs: 600,       // how long each on or off state lasts (keep it 150 ms or more per light)
  cooldownMs: 5000   // ignore new rings for this long after a flash sequence ends
};

let busy = false;     // true while a flash sequence is running
let queue = [];       // pending HTTP requests, sent one at a time
let sending = false;
let step = 0;
let statesRead = 0;

function methodFor(light, action) {
  return (light.type === "light" ? "Light." : "Switch.") + action;
}

function baseUrl(light, action) {
  return "http://" + light.ip + "/rpc/" + methodFor(light, action) + "?id=" + light.id;
}

// One request at a time keeps us well under the script's 5 RPC call limit
function onHttpDone(result, errCode, errMsg, job) {
  sending = false;
  if (errCode !== 0) {
    print("Request to", job.light.ip, "failed:", errMsg);
  }
  if (job.done) {
    job.done(errCode === 0 ? result : null, job.light);
  }
  sendNext();
}

function sendNext() {
  if (sending || queue.length === 0) return;
  sending = true;
  let job = queue.splice(0, 1)[0];
  Shelly.call("HTTP.GET", { url: job.url, timeout: 3 }, onHttpDone, job);
}

function enqueue(light, url, done) {
  queue.push({ light: light, url: url, done: done });
  sendNext();
}

function setLight(light, on) {
  if (light.skip) return;
  enqueue(light, baseUrl(light, "Set") + "&on=" + (on ? "true" : "false"), null);
}

function endCooldown() {
  busy = false;
}

function flashStep() {
  // Even steps flip each light away from where it was, odd steps put it back.
  // That way a light that was already on still visibly flashes.
  let flipped = (step % 2 === 0);
  for (let i = 0; i < CONFIG.lights.length; i++) {
    let l = CONFIG.lights[i];
    setLight(l, flipped ? !l.was : l.was);
  }
  step++;
  if (step < CONFIG.flashes * 2) {
    Timer.set(CONFIG.stepMs, false, flashStep);
  } else {
    print("Flash sequence done");
    Timer.set(CONFIG.cooldownMs, false, endCooldown);
  }
}

function onStateRead(result, light) {
  light.was = false;
  light.skip = (result === null);   // don't keep waiting on a light that's offline
  if (result && result.code === 200) {
    try {
      light.was = (JSON.parse(result.body).output === true);
    } catch (e) {
      print("Could not read state from", light.ip);
    }
  }
  statesRead++;
  if (statesRead === CONFIG.lights.length) {
    step = 0;
    flashStep();
  }
}

function startFlashing() {
  busy = true;
  statesRead = 0;
  for (let i = 0; i < CONFIG.lights.length; i++) {
    let l = CONFIG.lights[i];
    enqueue(l, baseUrl(l, "GetStatus"), onStateRead);
  }
}

function onStatus(status) {
  if (status.component !== "switch:0") return;
  if (!status.delta || status.delta.output !== true) return;
  if (busy) return;   // the chime still rings, the lights just finish their current run
  print("Doorbell rang, flashing lights");
  startFlashing();
}

Shelly.addStatusHandler(onStatus);
print("Doorbell light flasher running with", CONFIG.lights.length, "light(s)");
The script works with Gen2, Gen3 and Gen4 lights. It sends one request at a time, so the more lights you add, the more time each blink needs. A stepMs of 150 ms per light is a safe minimum (4 lights, 600 ms). If the doorbell gets pressed again while the lights are flashing, the chime still rings and the lights just finish what they're doing.
Everything here runs locally between the Shelly devices on your network. No cloud and no internet connection needed for the doorbell to ring and the lights to flash.